Tuesday, January 27, 2009

Genesis Chapter Captain

Captain Tories of the Genesis Chapter 2nd Company

Finally... A captain to lead my Genesis chapter into battle - and hopefully to victory. I must say the dice gods have not been kind to me as of late. I put a considerable amount of time and effort into this model and am very pleased with how he turned out. The dingy white on the banner vs. the brilliant white on the cape and robe was done intentionally. This way you're eyes are drawn towards the body of the model rather than its banner. I may still go back and work on the banner a little bit to make it less contrasting, but in the mean time I'm going to see what comments people have about it. On to the 'how to'...
  • I started from a Chaos Black undercoat and painted the power armour Mechrite Red.
  • Shading was done with a Devlan Mud wash and highlights by drybrushing Blood Red.
  • All of the gold areas were first painted Shining Gold followed by Brown Ink and highlighted with Burnished Gold. Additionally the bolter casing was lightly drybrushed with Mithril Silver to make it stand out a little more.
  • The inside of the cape and the robe were first painted with Codex Grey then highlights were done with Fortress Grey followed by Skull White.
  • The Purity Seal ribbons where painted Bleached Bone and then given a wash of Gryphonne Sepia and then highlighted with some thinned Bleached Bone.
  • The blue tassels, cape and purity seals were painted Ultramarines Blue and then washed with Asurman Blue followed by highlights of Ultramarines Blue. To coat the cape evenly I made sure to use a large tank brush for the wash and a small flat drybrush for the highlighting.
  • The metallic areas of the Bolter and Powersword were first painted with Boltgun Metal and washed with Badab Black and highlighted with lite a drybrushing Mithril Silver.

Sunday, January 25, 2009

The Find of the Year

Quite possibly the last Liber Chaotica: Complete book to not be sold. This particular one is a 2005 hard cover and is in excellent condition. The dust cover is slightly bent up around the edges, but the hard cover and pages are in perfect condition. Liber Chaotica: Complete originally retailed for $50 US, but after printing ceased and book shelves ran dry, prices hit the roof for these hardbacks. I am proud to be the original owner of this particular print and for a mere $39.99. Can you say 'the find of the year'?

How did I come across this great find you ask? Well... I was at a local hobby store, not to be confused with a gaming store, and coincidentally they had a sparse section of GW products. It seemed as though the store had attempted to carry GW, but it failed to catch on and stock dwindled to near nothing and was left stagnant. I just happened to look down at the floor and there it was, sitting there in a box of junk, covered in dust and looking as though it had been written off as another GW item no one would buy. I must have been in the favor of the Chaos gods.

If you're not familiar with Liber Chaotica it is a collection of five volumes that cover each of the four Chaos gods and their followers. It is herald as being the best narrative book on Chaos for both the Wahammer fantasy realm and the Warhammer 40,000 universe.

Tuesday, January 13, 2009

Genesis Chapter Tactical Squad


Tactical Squad Lucius of the Genesis Chapter 2nd Company

The first five models of the first Genesis Chapter tactical squad are complete. This particular photo makes them look a lot more red then what they really are, but you'll have to take my word for it, they do match the Dreadnought and Terminators. Perhaps the lighting and/or my camera settings weren't quite the same. Thankfully I don't claim to be a photographer. Oh well... I think the picture is still fairly nice. So on with it - How did I paint them?
  • I started from a Chaos Black undercoat and painted the whole miniature Mechrite Red.
  • To do the shading and highlighting I first gave the miniature a heavy wash of Devlan Mud followed by a drybrushing of Blood Red after the wash was given enough time to dry.
  • The shoulder guard trim and chest eagles were first painted Shining Gold followed by Brown Ink and highlighted with Burnished Gold.
  • The sergeants 'loin cloth' and some of the marines honour badges were first painted with Codex Grey then highlights were done with Fortress Grey followed by Skull White.
  • The Purity Seal ribbons where painted Bleached Bone and then given a wash of Gryphonne Sepia and then highlighted with some thinned Bleached Bone. The wax seal was painted Ultramarines Blue and then washed with Asurman Blue.
  • The metallic areas of the Bolters and Chainsword were first painted with Boltgun Metal and washed with Badab Black and highlighted with lite a drybrushing Mithril Silver.

Thursday, January 8, 2009

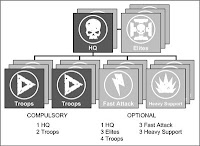
Fully Customizable Force Organization Chart

Do you make your own missions and scenarios? If you do then you should have a look at my fully customizable Force Organization Chart. The chart was done in MS Visio 2007 and does require Visio to fully take advantage of the customization, but I've also made a small pack of pre made FOC's that you can download as well. The Story: I was sitting at my computer last night after scheduling a game with a friend, (who just jumped back into the hobby) making up a list that would be appropriate for a small 500 pts. game. Not that it really matters, but I wanted to make up a customized FOC just for the fun of it. I did and it turned out even better then I imagined so now I'm sharing it with everyone.


Update: I have ported the chart over to MS Publisher (.pub) for those that may not have MS Visio.

Sunday, January 4, 2009

Realm of Battle Gameboard - Stage One


It's a new year and I'm kicking it off by getting things going on my Realm of Battle Gameboard. In this stage I first sprayed the rocky areas and skull pits using Chaos Black spray primer. Using the brown paint and the two inch brush from the GW Scenery Painting Pack I then painted all of the flat areas and stippled the paint around the rocky outcrops and skull pits. This stippling effect will help in adding depth around the rocks and pits so it's not just a straight border of colour. In this stage it's very important that I get a healthy amount of paint onto the gameboard as there's a good deal of detail that needs covered, plus a good base coat will help to hide any of the grey plastic that might try to sneak through thin areas of paint. In the next stage I'll be completing the rocks and skull pits so keep an eye out for Stage Two.

Recommended Posts

Blog Widget by LinkWithin